Mosaic Tutorial
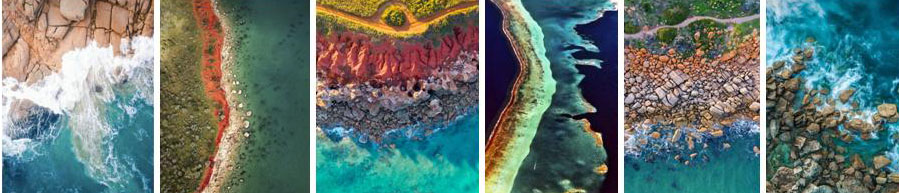
Welcome to my nature-inspired mosaic tutorial. This mosaic draws inspiration from aerial views of the earth — from woodlands and mountain ranges to rock formations, oceans, meandering rivers, fissures, beaches, and flowing streams. The design reflects the organic patterns, textures, and colours found in nature, transformed into unique mosaic artworks for you to create and enjoy.
These images showcase the landscapes and natural elements that influenced the creation of this collection.
Substrate (backing board)
For this mosaic, I am using Wedi Board, a lightweight, waterproof, silica-free backing board. MDF works well as a substrate for smaller pieces, such as this A4 mosaic, but for larger formats like A3 and A2, a lighter-weight backing board is essential for both practicality and ease of handling. The Wedi board foam edges are sealed with black grout. I have also installed Wedi Board fixings to support the wall-hanging system.
Tesserae (mosaic materials)
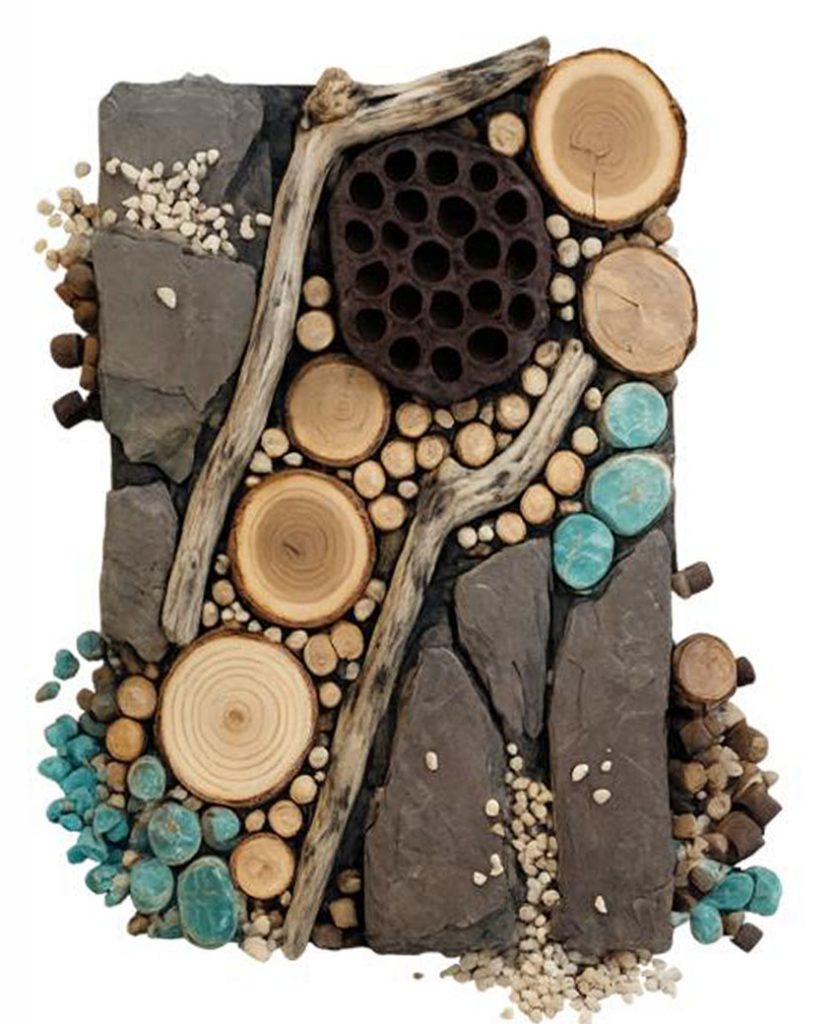
For this mosaic, I am working with 12mm-thick log slices in a variety of diameters, cut using my Lumberjack band saw. Working across several nature reserves gives me access to naturally sourced materials, as the rangers regularly manage the landscape, making fallen logs, branches, and twigs available. Additional materials include driftwood from a friend in Cornwall, beach-collected shells, reclaimed slate from a neighbour, a lotus pod, and fine stones—each chosen to reflect the textures and forms found in nature.
Tools & Materials
Prepare a flat working surface, protected with paper or newspaper. For this project, I am using Flexibond adhesive, which is intended for internal use only. Additional tools include a glue spreader, tweezers, and disposable gloves.
Design Preparation
When I begin creating a mosaic, I usually already have a clear idea of how I want the finished piece to look and which materials I plan to use to achieve it. In my workshop, I store different mosaic elements in separate boxes within open-front wall units, making it easy to select and organise materials. Once I’m ready to begin, I place the chosen boxes on my two large worktables, along with a few optional extras for flexibility as the design develops.
I then lay a prepared backing board on the work surface and keep a second backing board nearby, ready to transfer the completed design onto.
One of the most important aspects of the process is achieving balance across the entire mosaic. For a nature-inspired mosaic, balance comes from arranging organic materials in a way that feels natural yet harmonious. Consider the visual weight of each element—larger log slices, darker slate, or bold textures will naturally draw the eye, so these should be balanced with lighter or repeated elements elsewhere in the composition. Stepping back frequently helps ensure the piece feels cohesive rather than crowded.
Balance is about where the eye travels—if it gets stuck in one corner, the composition probably needs adjusting.
I create the design directly on the backing board, moving pieces around as the composition develops until I am satisfied with the final layout. I then transfer the mosaic in sections, gluing each part onto the second backing board as I go.
Below with the turquoise ceramic stones is an example of a temporary mosaic in the form of a kit I created for a colleague. The other image is the final design for this tutorial.
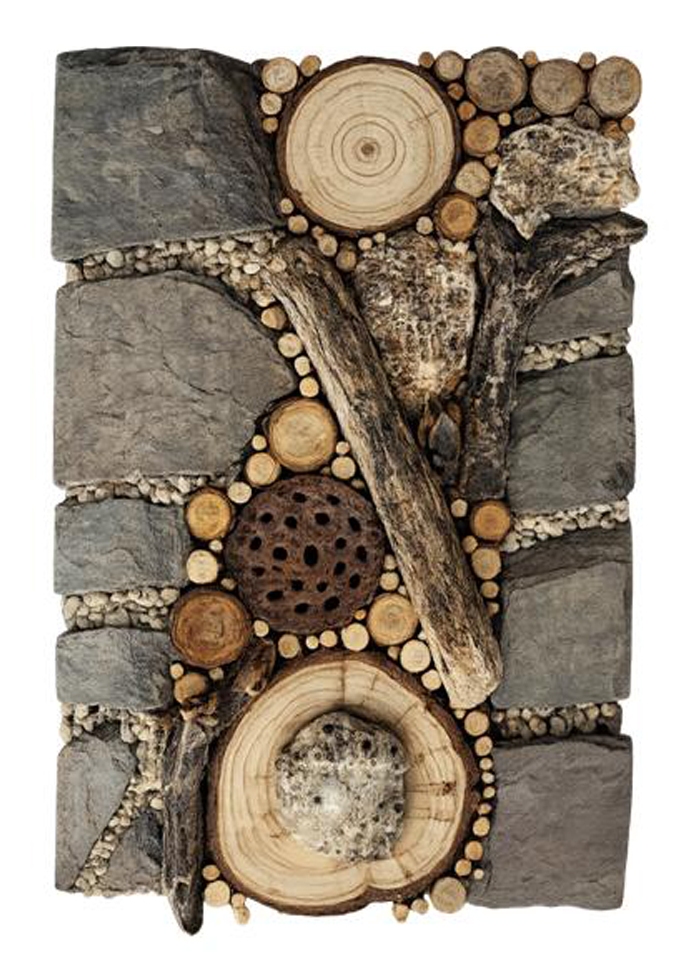
Let’s get Started
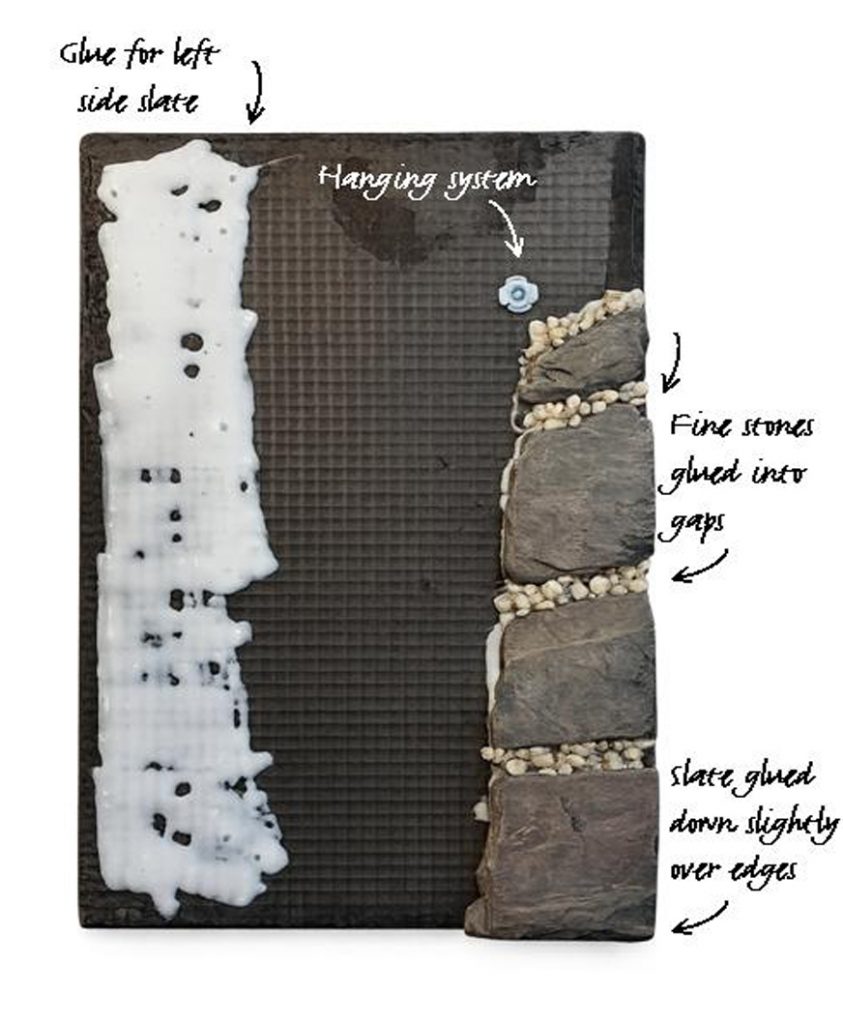
- Place a sheet of paper or old newspaper on a flat working surface.
- Lay the blank backing board on top, ensuring the hanging system is on the back and positioned at the top.
- Using a glue spreader (gloves are optional), apply adhesive to the area where the slate on the right-hand side will be placed.
- Position the slate pieces as shown, allowing them to slightly overlap the edges of the board while leaving small gaps between each piece.
- Sprinkle fine stones into the gaps to add texture and detail.
- Spread adhesive down the left hand side for the next slate area.
Next Steps
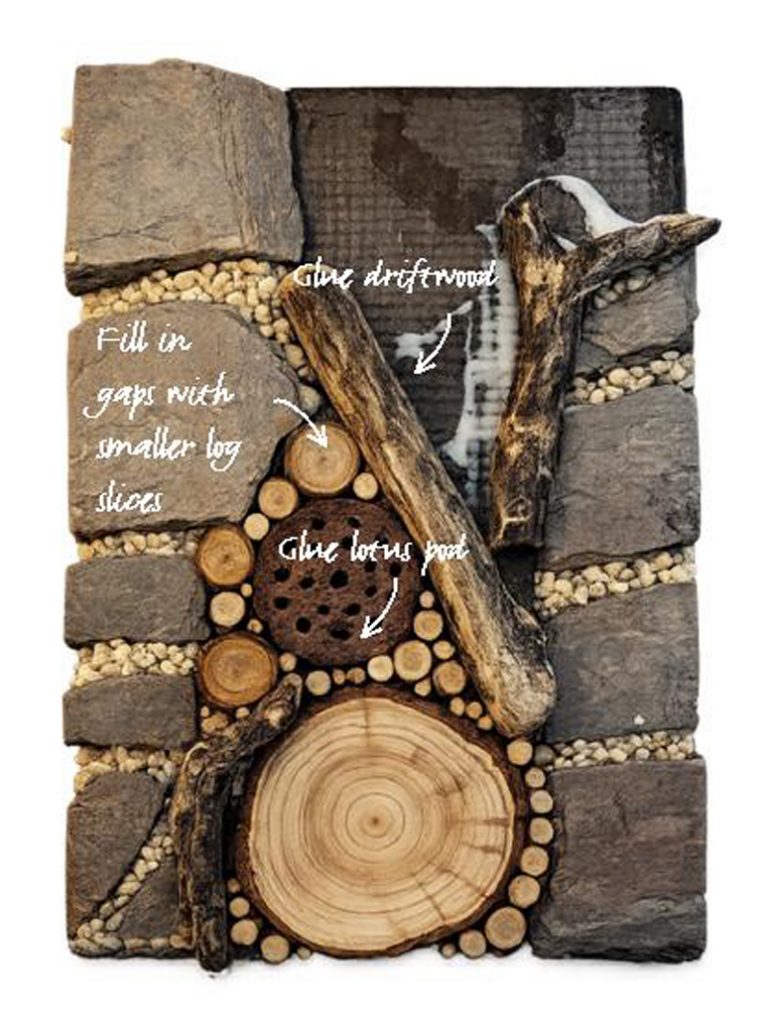
- Next, glue the driftwood in place, applying adhesive only to the areas that will come into contact with the backing board. If time allows, it is a good idea to let the adhesive set before continuing. This helps ensure that when the smaller log slices are added, they rest securely against the driftwood rather than causing it to shift. Alternatively, you may prefer to use a fast-drying adhesive for the driftwood.
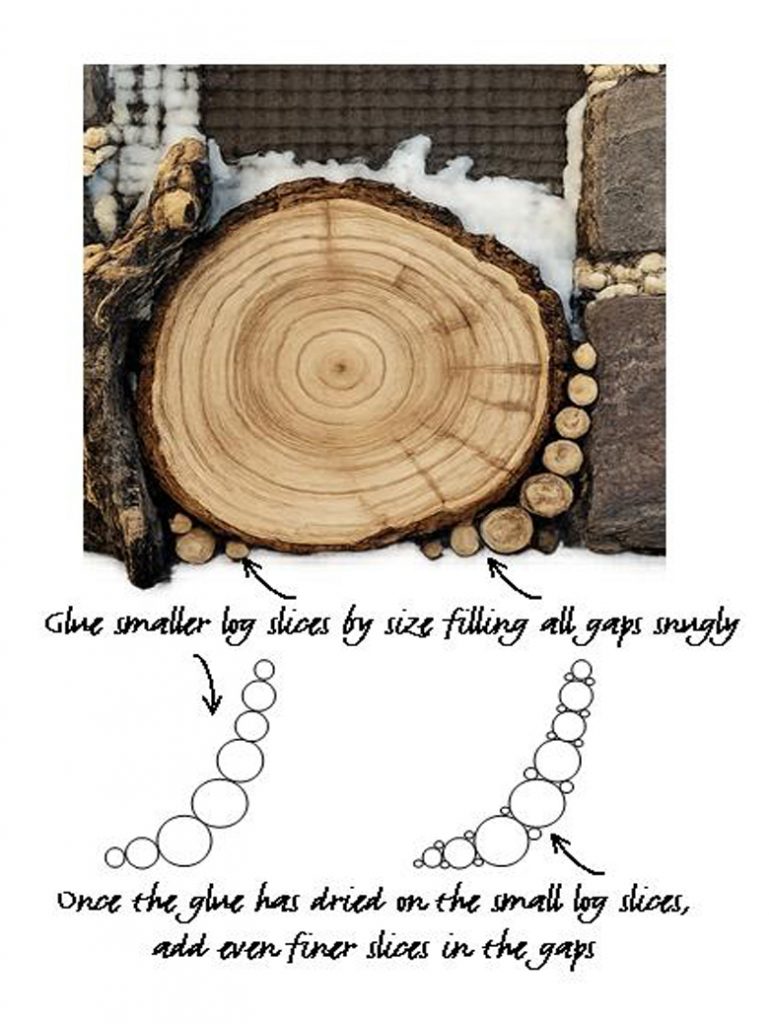
- At this stage, also glue the large log slice into position. The log slice should fit snugly with no gaps.

Next Steps
- It’s now time to start adding more detail using the smaller log, branch, and twig slices. It’s important to choose the largest slice that will fit each individual space so that the pieces sit snugly together.
- As shown in the diagram, once the smaller slices have been secured, you can return and add even finer slices to fill any remaining gaps completely.
- Attention to detail is what makes mosaics such wonderful creations to look at. Each tiny element contributes to the overall composition, and every time you look at the finished piece, you notice something new.
Next Steps
- Attach the third piece of driftwood along with the lotus pod.
- The back of the lotus pod will need to be trimmed so that it sits flat against the backing board.
- Again, it is best to wait until the driftwood has fully set before adding further detail, to prevent any movement while working.
- Once secure, continue filling the gaps with more small log, branch, and twig slices, returning later to add even finer pieces for extra texture and visual interest.
Next Steps
- Add the medium log slice and position the shells as shown.
- Then continue filling the surrounding gaps with smaller branch and twig slices, selecting pieces that fit snugly into each space.
- Once these are in place, return to add even finer pieces to fill any remaining gaps, building up texture and detail throughout the mosaic.

Attention to Detail
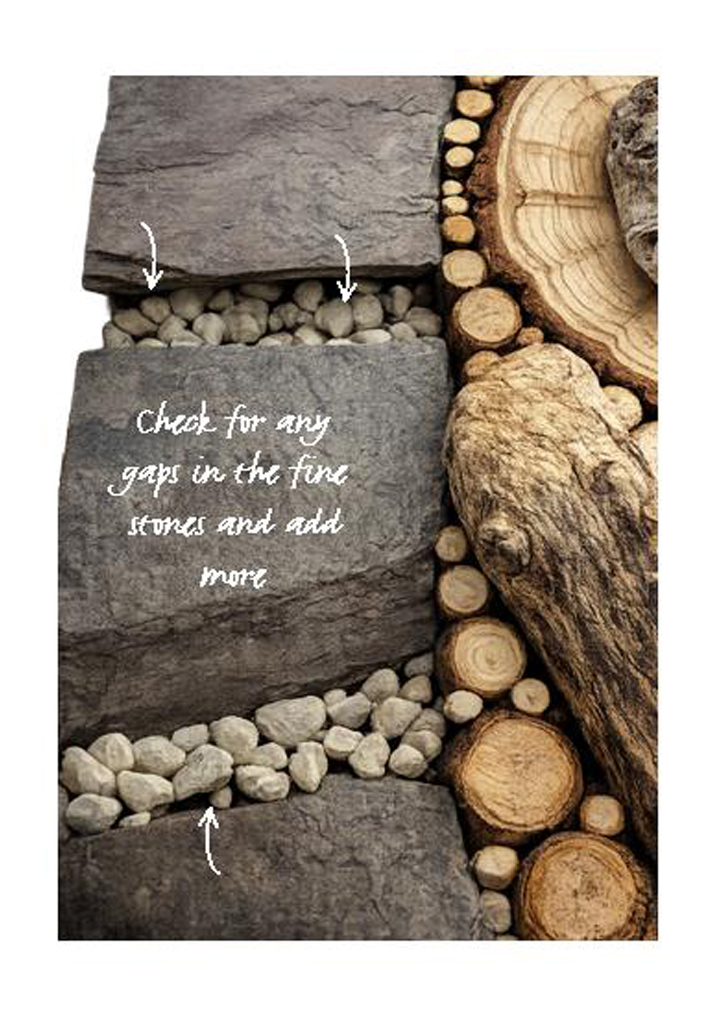
- Check for any gaps in the fine stones and add more where needed to create an even finish.
- Also inspect the spaces beneath the driftwood where it does not sit directly against the backing board, and carefully fill these areas with additional fine stones to maintain continuity and add detail throughout the design.
I hope you enjoyed this tutorial
